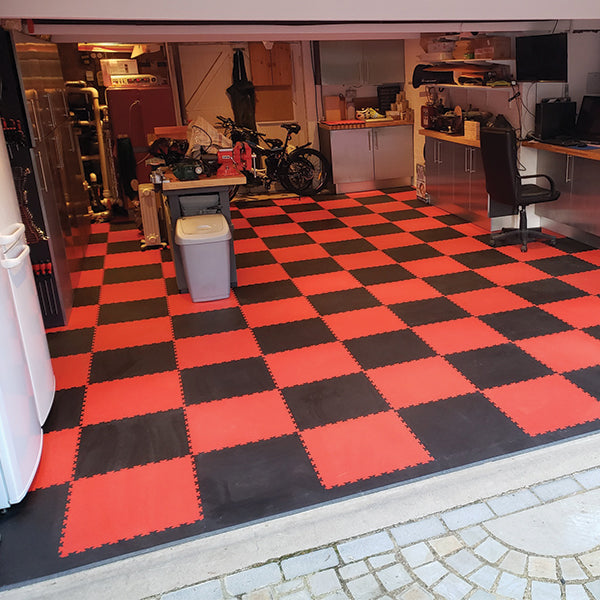
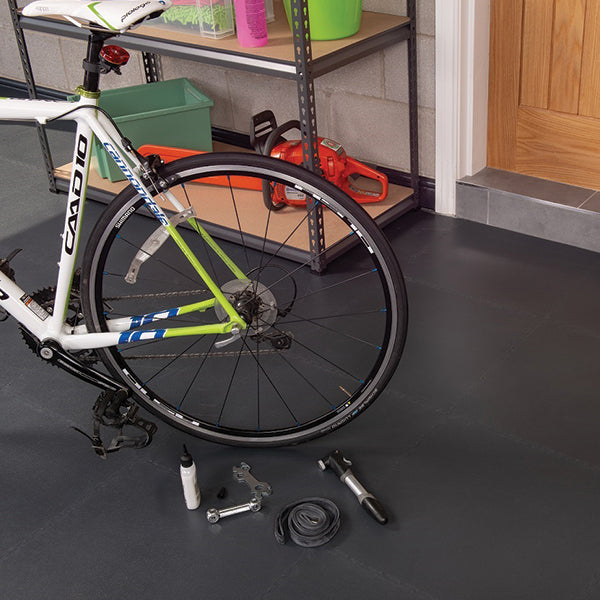
Garage Floor Tile

Garage Floor Tile

In Stock

Transform unutilised space in your home to create a new Home Office or just a storage area area quickly and easily with our new Floor Tiles. Ready to use all year round on almost any surface. 

Easy installation, no experience required

Great for clean and safe storage areas

Stands up to heavy foot traffic

Covers damp, dusty or cold floors in just 1 day

Tile Size: 500mm x 500mm, 4.5mm thick

Easy interlocking design allows for quick and simple installation, no adhesive required. Textured surface for anti-slip, so it’s a perfect choice for garages, gyms, or other rooms in the home where comfort and safety are essential.  Manufactured in the U.K. from 100% PVC.  Easy to clean and maintain. 

Each tile is 500mm x 500mm 

Tiles available in Light Grey and Dark Grey. 

Tiles are sold in m2 packs - e.g. £32.00 for a pack of 4 tiles to cover 1m2 area. Edge Ramps and Corners sold individually.

Please note: Floor Tiles are for internal use only. Exposure to sunlight or any heat source may cause tiles to expand and lift

Preparation

Sweep or vacuum the floor to remove any loose surface material. Remove any high points in the floor. Fill any large holes with Floorsaver Pourable Concrete Repair.

Allow the tiles to acclimatise in the room for at least 24 hours before application. The best temperature for application is 15 degrees C.

If it is colder, allow the tiles long enough to reach room temperature before application.

Application

Tools for the job: Rubber Mallet, Chalk Line, Large Ruler 

  1. Tiles must be kept square during installation. Every room has a different starting point. Find a straight wall or edge to work from. If you are using ramps, line them up first. Mark a straight chalk or laser line 1-1.5m away from the wall.
  2. Begin fitting the tiles together creating one row against the straight line. Adjust the position of the row carefully along the line considering the cuts to be made on either side.
  3. Continue to add tiles forming a pyramid.
  4. Continue to build the staggered pyramid by adding one full size tile to both ends of every row. When you can no longer lay any more full sized tiles, cut the remaining tiles to fit.
  5. Clean the floor thoroughly after installation.

Tile Cutting

Cutting Tools (one of): Concave Blade/Utility Knife, Jigsaw/Bandsaw, Guillotine

(if using a jigsaw, we recommend a rough or medium wood blade)

  1. To make a cut, turn a tile over and place it on top of an installed tile. Push it against the wall.
  2. Every tile has small bumps between each joint. Slide the tile left or right until you see the first bump on the tile underneath.
  3. Mark the back of the tile where it lines up with the highest point of the bump. Do the same for the other side of the cut (it should already line up with a bump).
  4. Join the two marks together with a metal ruler to create a cutting line.
  5. Cut the tile using your preferred method. When using a utility blade, score the cut line several times, then bend/fold the tile back and forth until it breaks cleanly.
  6. When the tile is turned over it should fit leaving a 5mm gap between the edge of the tile and the wall.
  7. Continue until you have completed the remaining cuts.

Tips for a Top Finish

  1. Leave an expansion gap (minimum of 5mm) between the tiles and any fixed point
  2. Don’t force tiles together - if they don’t fit together easily, something is wrong
  3. Undercut wooden doorjambs and slip the tiles underneath
  4. Use ramps to create safe transitions into the room
    Tile Size
    500mm x 500mm 
    Tile Thickness 4.5mm
    Material
    100% PVC

    QUESTIONS & ANSWERS

    Have a Question?

    Be the first to ask a question about this.

    Ask a Question